Showing posts with label Core Java. Show all posts

HashMap Example

Map is an Interface and which is available in java.util package and HashMap is an implementation of the Map interface. HashMap stores the data in key/value pair.

import java.util.HashMap;
import java.util.Iterator;
import java.util.Map;
import java.util.Map.Entry;

public class HashMapExample {

    public static void main(String[] args) {

        Map<Object, Object> map = new HashMap<Object, Object>();
        // put the key and values in String format
        map.put("1", "Java");
        map.put("2", "Programming in C");
        map.put("AI", "Lisp");
        map.put("Script", "JavaScript");

        System.out.println("Before Change - " + map.get("1"));
        System.out.println("Key \t Value");
        System.out.println("----------------");

        // loop through the map data using Iterator Interface
        Iterator<?> iterator = map.entrySet().iterator();
        Map.Entry<String, String> entry = null;
        while (iterator.hasNext()) {
            entry = (Entry<String, String>) iterator.next();
            System.out.println(entry.getKey() + "\t" + entry.getValue());
        }

        // Let's change the value for the key 1 and key 2
        map.put("1", "OOP");
        map.put("2", "Procedural");
        System.out.println("After Change - " + map.get("1"));
        System.out.println("After Change - " + map.get("2"));
    }
}


Output:

Java Program to show money change in dollars, quarters etc

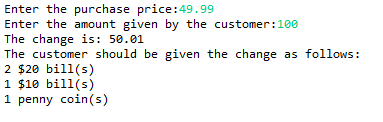
In this example we are going to look at the java program which will enable us to enter the money received by the customer and will populate the remaining amount to be given to the customer.

import java.util.Scanner;

public class MakeChange {

    public static void main(String[] args) {
        Scanner keyboard = new Scanner(System.in);
        int price;
        int provided;
        int change;
        System.out.print("Enter the purchase price:");
        price = (int) Math.round(keyboard.nextDouble() * 100);
        System.out.print("Enter the amount given by the customer:");
        provided = (int) Math.round(keyboard.nextDouble() * 100);
       
        if (provided > price) {
            System.out.println("The change is: " + ((provided - price)/100.00));
            System.out.println("The customer should be given the change as follows:");
            change = provided - price;
            // Since you multiplied by 100 you have to divide by 2000 to get the
            // number of twenties for change.
            int twenties = change / 2000;
           
            if (twenties > 0) { // if the change is less than $20 this will be a 0
                change = change % 2000; // this resets the value of change to
                // the remainder after the twenties are
                // calculated but only if there was at
                // least enough to make one twenty
                System.out.println(twenties + " $20 bill(s)");
            }
           
            int tens = change / 1000;
            if (tens > 0) {
                change = change % 1000;
                System.out.println(tens + " $10 bill(s)");
            }
           
            int fives = change / 500;
            if (fives > 0) {
                change = change % 500;
                System.out.println(fives + " $5 bill(S)");
            }
           
            int ones = change / 100;
            if (ones > 0) {
                change = change % 100;
                System.out.println(ones + " $1 bill(s)");
            }
           
            int quarters = change / 25;
            if (quarters > 0) {
                change = change % 25;
                System.out.println(quarters + " quarter coin(s)");
            }
           
            int dimes = change / 10;
            if (dimes > 0) {
                change = change % 10;
                System.out.println(dimes + " dime coin(s)");
            }
           
            int nickels = change / 5;
            if (nickels > 0) {
                change = change % 5;
                System.out.println(nickels + " nickel coin(s)");
            }
            int pennies = change;
            System.out.println(pennies + " penny coin(s)");
        }
        if (provided < price) { // this statement is saying that if the customer
            // doesn't pay enough, it will tell the user
            System.out.print("Not enough money!");
        } else if (provided == price) { // this statement says if the amount
            // provided matches the price, then
            // there is no change necessary
            System.out.print("No change is necessary!");
        }
    }
}


Output:


Java Diamond Pattern

In one of my previous post we have printed the Pyramid pattern. In this short tutorial we are going to print the Diamond pattern using java for loop.


public class StarDiamond {

    public static void main(String[] args) {

        int num = 5;
        for (int i = 1; i <= num; i++) {
            for (int j = num; j >= i; j--) {
                System.out.print(" ");
            }
            for (int m = 1; m <= i; m++) {
                System.out.print(" *");
            }
            System.out.print("\n");
        }
        for (int i = 1; i <= num; i++) {
            for (int j = 1; j <= i; j++) {
                System.out.print(" ");
            }
            for (int m = num; m >= i; m--) {
                System.out.print(" *");
            }
            System.out.print("\n");
        }
    }
}


Output:


You may also like:

Pyramid Pattern


Upload image file into database using java servlet, jdbc and mysql

In this example we are going to create a project which will enable users to upload the image into the database.
First of all turn on mysql database connection and open the mysql command line and paste the following sql script and create the new database as well as table.

create database AppDB;

use AppDB;

CREATE TABLE `contacts` (
  `contact_id` int(11) NOT NULL AUTO_INCREMENT,
  `first_name` varchar(45) DEFAULT NULL,
  `last_name` varchar(45) DEFAULT NULL,
  `photo` mediumblob,
  PRIMARY KEY (`contact_id`)
) ENGINE=InnoDB DEFAULT CHARSET=latin1


Now, lets create a dynamic web project into the eclipse and design the structure as follows:


Now, let's create the front end using the jsp pages.
uploadImage.jsp

<%@ page language="java" contentType="text/html; charset=ISO-8859-1"
    pageEncoding="ISO-8859-1"%>
<html>
<head>
<meta http-equiv="Content-Type" content="text/html; charset=ISO-8859-1">
<title>File Upload</title>
</head>
<body>
    <h1>Upload any image to mysql DB</h1>
    <form method="post" action="fileUpload"
        enctype="multipart/form-data">
        <table>
            <tr>
                <td>First Name:</td>
                <td><input type="text" name="firstName" size="10"
                    required="required" /></td>
            </tr>
            <tr>
                <td>Last Name:</td>
                <td><input type="text" name="lastName" size="10"
                    required="required" /></td>
            </tr>
            <tr>
                <td>Choose Image:</td>
                <td><input type="file" name="photo" size="10"
                    required="required" /></td>
            </tr>
            <tr>
                <td><input type="submit" value="Submit"></td>
                <td><input type="reset" value="Clear" /></td>
            </tr>
        </table>
    </form>
</body>
</html>


submit.jsp

<%@ page language="java" contentType="text/html; charset=ISO-8859-1"
    pageEncoding="ISO-8859-1"%>
<html>
<head>
<meta http-equiv="Content-Type" content="text/html; charset=ISO-8859-1">
<title>Success</title>
</head>
<body>
    <h3><%=request.getAttribute("Message")%></h3>
</body>
</html>


db.properties

driver=com.mysql.jdbc.Driver
url=jdbc:mysql://localhost:3306/AppDB
user=root
password=password 


DbUtil.java

package com.amzi.util;

import java.io.FileNotFoundException;
import java.io.IOException;
import java.io.InputStream;
import java.sql.Connection;
import java.sql.DriverManager;
import java.sql.SQLException;
import java.util.Properties;

public class DbUtil {

    private static Connection connection = null;

    public static Connection getConnection() {
        if (connection != null)
            return connection;
        else {
            try {
                Properties prop = new Properties();
                InputStream inputStream = DbUtil.class.getClassLoader().getResourceAsStream("/db.properties");
                prop.load(inputStream);
                String driver = prop.getProperty("driver");
                String url = prop.getProperty("url");
                String user = prop.getProperty("user");
                String password = prop.getProperty("password");
                Class.forName(driver);
                connection = DriverManager.getConnection(url, user, password);
            } catch (ClassNotFoundException e) {
                e.printStackTrace();
            } catch (SQLException e) {
                e.printStackTrace();
            } catch (FileNotFoundException e) {
                e.printStackTrace();
            } catch (IOException e) {
                e.printStackTrace();
            }
            return connection;
        }

    }
}


UploadServlet.java

package com.amzi.servlet;

import java.io.IOException;
import java.io.InputStream;
import java.sql.Connection;
import java.sql.PreparedStatement;
import java.sql.SQLException;

import javax.servlet.ServletException;
import javax.servlet.annotation.MultipartConfig;
import javax.servlet.annotation.WebServlet;
import javax.servlet.http.HttpServlet;
import javax.servlet.http.HttpServletRequest;
import javax.servlet.http.HttpServletResponse;
import javax.servlet.http.Part;

import com.amzi.util.DbUtil;

@WebServlet("/fileUpload")
@MultipartConfig(maxFileSize = 16177215) // upload file up to 16MB
public class UploadServlet extends HttpServlet {

    private static final long serialVersionUID = -1623656324694499109L;
    private Connection conn;

    public UploadServlet() {
        conn = DbUtil.getConnection();
    }

    protected void doPost(HttpServletRequest request,
            HttpServletResponse response) throws ServletException, IOException {
        
        // gets values of text fields
        String firstName = request.getParameter("firstName");
        String lastName = request.getParameter("lastName");

        InputStream inputStream = null;

        // obtains the upload file part in this multipart request
        Part filePart = request.getPart("photo");
        if (filePart != null) {
            // debug messages
            System.out.println(filePart.getName());
            System.out.println(filePart.getSize());
            System.out.println(filePart.getContentType());

            // obtains input stream of the upload file
            inputStream = filePart.getInputStream();
        }

        String message = null; // message will be sent back to client

        try {
            // constructs SQL statement
            String sql = "INSERT INTO contacts (first_name, last_name, photo) values (?, ?, ?)";
            PreparedStatement statement = conn.prepareStatement(sql);
            statement.setString(1, firstName);
            statement.setString(2, lastName);

            if (inputStream != null) {
                // fetches input stream of the upload file for the blob column
                statement.setBlob(3, inputStream);
            }

            // sends the statement to the database server
            int row = statement.executeUpdate();
            if (row > 0) {
                message = "Image is uploaded successfully into the Database";
            }
        } catch (SQLException ex) {
            message = "ERROR: " + ex.getMessage();
            ex.printStackTrace();
        }
        // sets the message in request scope
        request.setAttribute("Message", message);

        // forwards to the message page
        getServletContext().getRequestDispatcher("/submit.jsp").forward(
                request, response);
    }
}


Now, we are ready to run the project and once we run the project we are able to view the following result.


Click here to download the code.

You may also like...

Check username availability using Java, JSP, AJAX, MySQL, JDBC, Servlet

Login application using jsp servlet and mysql database

JSF login and register application


Call by value example

Below example will explain how call by value is happening in java.

public class CallByValue {

    private int value = 5;

    private int change(int input) {
        input = input + 10;// changes will be in the local variable only
        return input;
    }

    public static void main(String args[]) {
        CallByValue cv = new CallByValue();

        System.out.println("before change: " + cv.value);
        System.out.println("calling change method directly: " + cv.change(50));
        System.out.println("after change: " + cv.value);
    }
}


Output:

before change: 5
calling change method directly: 60
after change: 5

User definded object in ArrayList - Generics Example

Here, we are going to create a list of user defined object type. First of all we can create a java object with some sample fields and getters and setters methods along with overridden toString method.

User.java

package com.amzi.examples;

public class User {

    private String userName;
    private String password;

    public String getUserName() {
        return userName;
    }

    public void setUserName(String userName) {
        this.userName = userName;
    }

    public String getPassword() {
        return password;
    }

    public void setPassword(String password) {
        this.password = password;
    }

    @Override
    public String toString() {
        return "User [userName=" + userName + ", password=" + password + "]";
    }
}


Now, we are going to write a java class which will create a list of this user object and will see various list methods.

ArrayListExample.java

package com.amzi.examples;

import java.util.ArrayList;
import java.util.List;

public class ArrayListExample1 {

    public static void main(String[] args) {

        // initializing user object with some sample data
        User user1 = new User();
        user1.setUserName("Amzi");
        user1.setPassword("password1");

        User user2 = new User();
        user2.setUserName("Saiyad");
        user2.setPassword("password2");

        // initializing list object of type User
        List<User> list = new ArrayList<User>();

        // adding user object into the list
        list.add(user1);
        list.add(user2);

        System.out.println("Printing user1 elements: " + user1);

        System.out.println("Printing list object: " + list);

        // looping through the userObject and list
        for (User u : list) {
            System.out.println(u.getUserName() + "\t--  " + u.getPassword());
        }
    }
}


Output:

Printing user1 elements: User [userName=Amzi, password=password1]
Printing list object: [User [userName=Amzi, password=password1], User [userName=Saiyad, password=password2]]
Amzi    --  password1
Saiyad    --  password2

ArrayList example

In this example we are going to see the java ArrayList in action. List is the interface and ArrayList is the implementation of the List interface.

Here, we are going to create a list which will take Integer types and then we are going to iterate them in a loop and print out the result.

package com.amzi.examples;

import java.util.ArrayList;
import java.util.List;

public class ArrayListExample {

    public static void main(String[] args) {

        // invoke and create the list of 5 Integer objects
        // declaring generics type as Integer so only Integer value can fit in
        // instead of Integer type we can also add String or other Object type
        List<Integer> list = new ArrayList<Integer>(5);
        // calling add method to add the element into the list
        list.add(15);
        list.add(20);
        list.add(25);
        list.add(15);
        list.add(20);
        list.add(15);// duplicate values can be added
        list.add(null);// null also can be added.

        // loop through the list elements
        for (Integer index : list) {
            System.out.println("First List elements: " + index);
        }
        System.out.println("========================");

        // at second position of the existing list, adding new Integer value
        // list index starts from 0
        list.add(2, 22);

        // loop through the list after adding the new element
        for (Integer index : list) {
            System.out.println("Second list elements: " + index);
        }
    }
}


Output:

First List elements: 15
First List elements: 20
First List elements: 25
First List elements: 15
First List elements: 20
First List elements: 15
First List elements: null
========================
Second list elements: 15
Second list elements: 20
Second list elements: 22
Second list elements: 25
Second list elements: 15
Second list elements: 20
Second list elements: 15
Second list elements: null

Convert json to java object using Gson library

I published the last post about how to convert java object into the json format. We are going to reuse some of its code so take a look at the previous post by clicking here

Make sure you have the Gson library installed in your class path, I described that in my previous post.
Lets create a json file with some sample data in it.

testFile.json

{
  "id": 1,
  "name": "Amzi",
  "skills": [
    "Java",
    "JSP",
    "JDBC"
  ]
}


Now, lets create a java class which will read the json file and convert that into the java object.

Json2Java.java

package com.amzi.java;

import java.io.BufferedReader;
import java.io.FileReader;
import java.io.IOException;
import com.google.gson.Gson;

public class Json2Java {
    public static void main(String[] args) {

        Gson gson = new Gson();
        try {
            //read json file from the buffered reader object
            BufferedReader br = new BufferedReader(new FileReader(
                    "c:\\users\\amzi\\desktop\\testFile.json"));

            // convert the json string back to object
            TestObject obj = gson.fromJson(br, TestObject.class);

            System.out.println(obj);

        } catch (IOException e) {
            e.printStackTrace();
        }
    }
}


Output:

TestObject [ID = 1, name = Amzi, skills = [Java, JSP, JDBC]]

Convert java object to json format using Gson library

In one of my previous post we have discussed about the same topic but using jackson library. For your reference - click here

In this example we are going to see how to convert java object into the json format using Google's Gson library.

Gson is pretty easy to understand and it has mainly below two methods to note.
  • toJson() – Convert Java object to JSON format
  • fromJson() – Convert JSON into Java object
First of all, in order for us to compile the code we need the Gson library. For maven users please paste the below dependency inside your pom.xml file. Non maven users can download it online and paste it in the project class path.

pom.xml

 <dependency>
  <groupId>com.google.code.gson</groupId>
  <artifactId>gson</artifactId>
  <version>1.7.1</version>
 </dependency>

Now, lets create a java test object with some initialized values. Later on we are going to convert this java object to json format using Gson library.

TestObject.java

import java.util.ArrayList;
import java.util.List;

public class TestObject {
    private int id = 1;     private String name = "Amzi";     private List<String> skills = new ArrayList<String>() {         {             add("Java");             add("JSP");             add("JDBC");         }     };     public int getId() {         return id;     }     public void setId(int id) {         this.id = id;     }     public String getName() {         return name;<     }     public void setName(String name) {         this.name = name;     }     public List<String> getSkills() {         return skills;     }     public void setSkills(List<String> skills) {         this.skills = skills;     }     @Override     public String toString() {         return "TestObject [ID = " + id + ", name = " + name + ", skills = "                 + skills + "]";     } }


Below is the core logic which will enable us to convert the java object to json. We are going to use the toJson() method which is available in Gson object

Java2Json.java

package com.amzi.java;
import java.io.FileWriter; import java.io.IOException; import com.google.gson.Gson; import com.google.gson.GsonBuilder; public class Java2Json {     public static void main(String[] args) {         TestObject obj = new TestObject();         //initialize Gson object         //setPrettyPrinting().create() is for batter formating.         Gson gson = new GsonBuilder().setPrettyPrinting().create();         // convert java object to JSON format,         // and returned as JSON formatted string         String json = gson.toJson(obj);         try {             // write converted json data to a file named "testFile.json"             FileWriter writer = new FileWriter(                     "c:\\users\\amzi\\desktop\\testFile.json");             writer.write(json);             writer.close();         } catch (IOException e) {             e.printStackTrace();         }         System.out.println(json);     } }


Along with the below output into the console we may also check for the newly created testFile.json in the location we mentioned.

Output:

{
  "id": 1,
  "name": "Amzi",
  "skills": [
    "Java",
    "JSP",
    "JDBC"
  ]
}

Convert Json to Java object using Jackson library

I published a post on "how to convert java object into the json format. In case you missed it, click here for your reference. Today, we are going to reverse that, meaning from the json file we are going to read and convert that into the java object.

We have the json file in the local machine user.json

user.json

{"messages":["Your name is - Amzi","Your Id is - 1","Welcome to the world!!!"],"name":"Amzi","id":1}


I'd assume that you already have the required jackson library in your project class path. I described that in my previous post in detail.

Now, lets create the java file which will read json file and create the java object out of it. For that we are going to use the readValue() method which is available in ObjectMapper class. ObjectMapper class is the part of the jackson library.

Json2Java.java

package com.amzi.java;

import java.io.File;
import java.io.IOException;

import org.codehaus.jackson.JsonGenerationException;
import org.codehaus.jackson.map.JsonMappingException;
import org.codehaus.jackson.map.ObjectMapper;

public class Json2Java {

    public static void main(String[] args) {

        ObjectMapper mapper = new ObjectMapper();
        try {
            // read from file, convert it to user class
            User user = mapper.readValue(new File(
                    "c:\\Users\\Amzi\\Desktop\\user.json"), User.class);

            // display to console
            System.out.println(user);

        } catch (JsonGenerationException e) {
            e.printStackTrace();
        } catch (JsonMappingException e) {
            e.printStackTrace();
        } catch (IOException e) {
            e.printStackTrace();
        }
    }
}


Output:

User [id=1, name=Amzi, messages=[Your name is - Amzi, Your Id is - 1, Welcome to the world!!!]]

Convert java object to Json using jackson library

In this example we are going to learn how to convert java object into the json format.

Lets create a maven project into the eclipse workspace. Open up the pom.xml file and paste the following code inside the project node.

If you are not using maven then you may download the library from the google and add it to the class path.

pom.xml

  <repositories>
    <repository>
        <id>codehaus</id>
        <url>http://repository.codehaus.org/org/codehaus</url>
    </repository>
  </repositories>

  <dependencies>
    <dependency>
        <groupId>org.codehaus.jackson</groupId>
        <artifactId>jackson-mapper-asl</artifactId>
        <version>1.8.5</version>
    </dependency>
  </dependencies>


Lets create the User object first. This is a java object with 2 fields and a list.

User.java

package com.amzi.java;

import java.util.ArrayList;
import java.util.List;

public class User {

    private int id = 01;
    private String name = "Amzi";
    private List<String> messages = new ArrayList<String>();
    {

        messages.add("Your name is - " + name);
        messages.add("Your Id is - " + id);
        messages.add("Welcome to the world!!!");

    }

    public int getId() {
        return id;
    }

    public void setId(int id) {
        this.id = id;
    }

    public String getName() {
        return name;
    }

    public void setName(String name) {
        this.name = name;
    }

    public List<String> getMessages() {
        return messages;
    }

    public void setMessages(List<String> messages) {
        this.messages = messages;
    }

    @Override
    public String toString() {
        return "User [id=" + id + ", name=" + name + ", " + "messages="
                + messages + "]";
    }
}


Jackson library provides us the writeValue() method and which is available in ObjectMapper class. In this method we are going to pass the location where we want to save the json file.

Java2Json.java

package com.amzi.java;

import java.io.File;
import java.io.IOException;
import org.codehaus.jackson.JsonGenerationException;
import org.codehaus.jackson.map.JsonMappingException;
import org.codehaus.jackson.map.ObjectMapper;

public class Java2Json {
    public static void main(String[] args) {

        User user = new User();
        ObjectMapper mapper = new ObjectMapper();

        try {
            // converts user object to json string, and save to a file
            mapper.writeValue(
                    new File("c:\\Users\\Amzi\\Desktop\\user.json"), user);

            // display to console
            System.out.println(mapper.defaultPrettyPrintingWriter()
                    .writeValueAsString(user));
           
        } catch (JsonGenerationException e) {
            e.printStackTrace();
        } catch (JsonMappingException e) {
            e.printStackTrace();
        } catch (IOException e) {
            e.printStackTrace();
        }
    }
}


Now, we are done parsing the java object into the json format. Once we run the above java class, we are going to get following output into the console and also the same output will be saved inside the user.json file.

Output:

{
  "messages" : [ "Your name is - Amzi", "Your Id is - 1", "Welcome to the world!!!" ],
  "name" : "Amzi",
  "id" : 1
}

Read values from CSV file using BufferedReader and split using StringTokenizer

In my previous post I have explained about the StringTokenizer object. Please click here to review my previous post on StringTokenizer.

In this example we are going to read the input value from the CSV file and split them by a pipe ("|") delimiter and iterate them by using StringTokenizer object.

First of all lets create a csv file and input some test data to it.

test.csv


Now lets create the java class in which we are going to read the csv file by using BufferedReader objec. Then, we are going to use the StringTokenizer object and will specify the delimiter as pipe ("|"). The next step is to iterate the each element that we are getting and displaying them. Please have a look at the below code snippet.

ReadFromFile.java

import java.io.BufferedReader;
import java.io.FileReader;
import java.io.IOException;
import java.util.StringTokenizer;

public class ReadFromFile {

    public static void main(String[] args) {

        BufferedReader br = null;
        try {
            String line;
            br = new BufferedReader(new FileReader(
                    "c:/Users/Amzi/Desktop/test.csv"));

            while ((line = br.readLine()) != null) {
                System.out.println(line);
                System.out.println("-------------");

                StringTokenizer stringTokenizer = new StringTokenizer(line, "|");
               
                while (stringTokenizer.hasMoreElements()) {

                    Integer id = Integer.parseInt(stringTokenizer.nextElement()
                            .toString());
                    Double balance = Double.parseDouble(stringTokenizer
                            .nextElement().toString());
                    String username = stringTokenizer.nextElement().toString();

                    StringBuilder sb = new StringBuilder();
                    sb.append("\nId : " + id);
                    sb.append("\nBalance : " + balance);
                    sb.append("\nUsername : " + username);
                    sb.append("\n*******************\n");

                    System.out.println(sb);
                }
            }

            System.out.println("Successfully completed");

        } catch (IOException e) {
            e.printStackTrace();
        } finally {
            try {
                if (br != null)
                    br.close();

            } catch (IOException ex) {
                ex.printStackTrace();
            }
        }
    }
}


Output

1| 1.11| Amzi
-------------

Id : 1
Balance : 1.11
Username :  Amzi
*******************

2| 3.33| Saiyad
-------------

Id : 2
Balance : 3.33
Username :  Saiyad
*******************

Successfully completed

StringTokenizer in Java

StringTokenizer is a java object which is available in java.util package. Using this object we can split the String into multiple chunks and have it used as per the business use case.

We can split the String by providing any delimiters to it or default delimiter is "space". Let's have a look at the below example.

import java.util.StringTokenizer;

public class StringTokenizerTest {
    public static void main(String[] args) {

        String test = "This is an : example string: we are going : to split it";
        StringTokenizer st1 = new StringTokenizer(test);

        System.out.println("---- Split by space(by default) ------");
        while (st1.hasMoreElements()) {
            System.out.println(st1.nextElement());
        }

        System.out.println("---- Split by colon ':' ------");
        StringTokenizer st2 = new StringTokenizer(test, ":");

        while (st2.hasMoreElements()) {
            System.out.println(st2.nextElement());
        }
    }
}


Output:

---- Split by space(by default) ------
This
is
an
:
example
string:
we
are
going
:
to
split
it
---- Split by colon ':' ------
This is an
 example string
 we are going
 to split it

Check username availability using Java, JSP, AJAX, MySQL, JDBC, Servlet


Hey guys, today we are gonna be developing the username availability application based on the real world scenario and using the technologies which are used across almost all the major IT firms.

Before we begin writing the code I'd assume that you guys have following software installed.

  1. Eclipse IDE
  2. Tomcat app server
  3. MySQL Database


Alright, first of all we are going to start the DB and will create the database and the table. After that we can enter some test values. Check the script below.
MySQL Script:
create database students;

create table users(
 uid int primary key 
        auto_increment,
 uname varchar(20) unique
 );

INSERT INTO `students`.`users` 
(`uid`, `uname`) VALUES ('1', 
'Amjad');INSERT INTO 
`students`.`users` (`uid`, 
`uname`) VALUES ('2', 'Amzi');


Create a dynamic web project in your IDE workspace and the project structure should look something like this.

Next are going to create the view using jsp, the view will consist of a simple text box which will check if the input string value is 3 character long or not. If yes then it will go ahead and make a query and will check the availability of the username.

index.jsp


Username Availability


Now, we are going to write a servlet which will create a database connection and make a query to it.
CheckAvailability.java
package com.amzi.servlets;

import java.io.*;
import java.sql.*;
import javax.servlet.ServletException;
import javax.servlet.http.*;

public class CheckAvailability extends HttpServlet {

 private static final long serialVersionUID = -734503860925086969L;

 protected void doPost(HttpServletRequest request, HttpServletResponse response)
            throws ServletException, IOException {
        response.setContentType("text/html;charset=UTF-8");
        PrintWriter out = response.getWriter();
        try {

            String connectionURL = "jdbc:mysql://localhost:3306/students"; // students is my database name
            Connection connection = null;
            Class.forName("com.mysql.jdbc.Driver").newInstance();
            connection = DriverManager.getConnection(connectionURL, "root", "password");
            String uname = request.getParameter("uname");
            PreparedStatement ps = connection.prepareStatement("select uname from users where uname=?");
            ps.setString(1,uname);
            ResultSet rs = ps.executeQuery();
             
            if (!rs.next()) {
                out.println(""+uname+" is avaliable");
            }
            else{
            out.println(""+uname+" is already in use");
            }
            out.println();

        } catch (Exception ex) {
            out.println("Error ->" + ex.getMessage());
        } finally {
            out.close();
        }
    }

    protected void doGet(HttpServletRequest request, HttpServletResponse response)
            throws ServletException, IOException {
        doPost(request, response);
    }
}


Also, we can configure the deployment descriptor as follows.
web.xml


        check
        com.amzi.servlets.CheckAvailability
    
    
        check
        /check


            30


        index.jsp


Note: In addition to these code we also need jquery library and mysql connector jar file. Just in case you are unable to find those, you may click here to get the complete source code.

Now, we are all set to deploy and test the code on the server. We can hit the below url
http://localhost:8080/UserAvailability/
And, the page will look something like this

Understanding Java Recursion...Factorial Example

In one line if someone wanted to explain,
"Recursion is, the method that call itself". Easy enough ehy...

If the input number is 0 or 1, we are returning 1 else we are going to compute the result as
n! = n * (n-1)!
A simple mathematics formula.

Here I am going to create the static method so, I don't have to create an instance of the method and can call just with the method name.

Note:
Here the datatype that I'm using is int so, ofcourse it may have some limitations and hence you can't go beyond certain limit however you guys may go ahead and have it double, long etc.

Let's have a look at the way we can code for any factorials using Java Recursion concept.

public class RecursionExample {

 private static int factorial(int input) {
  int fact = 0;
  if (input <= 1)
   fact = 1;
  else
   fact = input * factorial(input - 1);

  return fact;
 }

 public static void main(String[] args) {
  System.out.println(factorial(5));
 }
}
The above example will print out 120 as an output.

Create and write content into CSV file / Spread-sheet

Below example will illustrate how to create a csv or excel file and write any desired content into it. In this example we are going to use the FileWriter object and which is available in java.io package.

package com.amzi.xml;

import java.io.FileWriter;
import java.io.IOException;

public class CreateCsvFile {
 private static void generateCsvFile(String fileName) {
  FileWriter writer = null;
  try {
   writer = new FileWriter(fileName);
   writer.append("Name");
   writer.append(',');
   writer.append("ID");
   writer.append('\n');

   writer.append("Amzi");
   writer.append(',');
   writer.append("001");
   writer.append('\n');

   writer.append("Bond");
   writer.append(',');
   writer.append("007");
   writer.append('\n');

   System.out.println("CSV file is created...");

  } catch (IOException e) {
   e.printStackTrace();
  } finally {
   try {
    writer.flush();
    writer.close();
   } catch (IOException e) {
    e.printStackTrace();
   }
  }
 }

 public static void main(String[] args) {
  String location = "/users/Amzi/test.csv";
  generateCsvFile(location);
 }
}

Validate phone number using java regular expression

In this example we are going to be validating any phone number. We are going to put following checks against any phone number under test.

  • The phone number should be 10 digit number.
  • Splitted by hi-fen(-) and the end result should look like xxx-xxx-xxxx

package com.amzi.xml;

import java.util.regex.Matcher;
import java.util.regex.Pattern;

public class ValidatePhoneNumber {
 public static void main(String[] args) {

  String phNumber = "123-222-3333";
  //String phNumber = "123 123 1234";

  Pattern pattern = Pattern.compile("\\d{3}-\\d{3}-\\d{4}");
  Matcher matcher = pattern.matcher(phNumber);

  if (matcher.matches()) {
   System.out.println("Phone Number is Valid");
  } else {
   System.out
   .println("Phone Number isn't in this formate XXX-XXX-XXXX");
  }
 }
}

Output
Phone Number is Valid

How to get any webpage/URL content and save it on local drive using java code.

Alright, so today we are going to be coding to get the snapshot of any website. Here, we are using two jdk inbuilt packages java.io and java.net
This code is pretty self explanatory however, wherever required I've added the comments.
package com.amzi;

import java.io.BufferedReader;
import java.io.BufferedWriter;
import java.io.File;
import java.io.FileWriter;
import java.io.IOException;
import java.io.InputStreamReader;
import java.net.MalformedURLException;
import java.net.URL;
import java.net.URLConnection;

public class GetWebpageContent {
 public static void main(String[] args) {

  URL url;

  try {
   // enter any url to get its content
   url = new URL("http://www.javaandj2eetutor.blogspot.com");
   URLConnection conn = url.openConnection();

   // open the stream and put it into BufferedReader
   BufferedReader br = new BufferedReader(new InputStreamReader(
     conn.getInputStream()));
   String inputLine;

   // save it anywhere in local machine for offline use
   String fileName = "/users/Amzi/test.html";
   File file = new File(fileName);
   if (!file.exists()) {
    file.createNewFile();
   }

   FileWriter fw = new FileWriter(file.getAbsoluteFile());
   BufferedWriter bw = new BufferedWriter(fw);

   while ((inputLine = br.readLine()) != null) {
    bw.write(inputLine);
   }

   bw.close();
   br.close();

   System.out.println("Your file is saved in " + fileName
     + " location.");

  } catch (MalformedURLException e) {
   e.printStackTrace();
  } catch (IOException e) {
   e.printStackTrace();
  }

 }
}

Once we run the above program, if everything goes fine then the URL content supposed to be saved in the location we specified in the program and in the console weare supposed to see something like this.
Your file is saved in /users/Amzi/test.html location.

How to read and manipulate values from text file by using java code

First of all create a text file and call it "txtFile.txt", now add the following values into the text file.

10
50.1
Amzi

Now, create a java class into the same folder where you have stored the txtFile.txt
The java class will be as follows.

import java.io.File;
import java.io.FileNotFoundException;
import java.util.Scanner;

public class ManipulateTxtfile {

    public static void main(String[] args) {
        try {
            Scanner in = new Scanner(
                    new File("txtFile.txt"));
            int first = in.nextInt();
            double second = in.nextDouble();
            String name = in.next();
            double sum = first + second;
            System.out.println("Hello " + name + "\nThe sum of " + first
                    + " and " + second + " is = " + sum);
        } catch (FileNotFoundException e) {
            e.printStackTrace();
        }
    }
}


The output of the above program will look something like this:

Hello Amzi
The sum of 10 and 50.1 is = 60.1

Run some task periodically using core java concepts

In this example we are going to write a java program which will run every 2 seconds and will perform some task for us. In our example we are simply going to print the new date time stamp after every two seconds but in a real world there could be plenty of scenarios one can think of. One example could be updating the user interface after every few seconds and fetch the latest data from the database.

The code is pretty self explanatory, by looking at the embedded comments it will be even easier. 

import java.util.Date;
import java.util.Timer;
import java.util.TimerTask;

/**
 *
 * @author Amzi
 */
public class Scheduler extends TimerTask {

    Date currentTime;

    // Add your core logic/business use case
    public void run() {
        currentTime = new Date();
        System.out.println("The current Time is :" + currentTime);
    }

    public static void main(String args[]) throws InterruptedException {

        Timer timer = new Timer(); // Step 1 - Instantiate Timer Object
        Scheduler sc = new Scheduler(); // Step 2 - Instantiate the class
        timer.schedule(sc, 0, 2000); // Step 3 - Create task for every 2 seconds
        // Using the for loop along with the System.exit to terminate the
        // program otherwise it will keep on running
        for (int i = 0; i <= 5; i++) {
            System.out.println("Execution in Main Thread..." + i);
            // Make thread sleep for 2 seconds
            Thread.sleep(2000);
            if (i == 5) {
                System.out.println("We are getting out of here...");
                System.exit(0);
            }
        }
    }
}


The above code will print the following output into the console.

Execution in Main Thread...0
The current Time is :Mon Nov 25 14:33:07 EST 2013
Execution in Main Thread...1
The current Time is :Mon Nov 25 14:33:09 EST 2013
Execution in Main Thread...2
The current Time is :Mon Nov 25 14:33:11 EST 2013
Execution in Main Thread...3
The current Time is :Mon Nov 25 14:33:13 EST 2013
Execution in Main Thread...4
The current Time is :Mon Nov 25 14:33:15 EST 2013
The current Time is :Mon Nov 25 14:33:17 EST 2013
Execution in Main Thread...5
We are getting out of here...
The current Time is :Mon Nov 25 14:33:19 EST 2013